Cocoapods使用简介
戴维营教育原创文章,转载请注明出处。我们的梦想是做最好的iOS开发培训!
什么是CocoaPods?
在开发一个应用的时候,我们通常很少从零开始编写所有功能代码,而是大量的使用已有的开源代码来减少工作量和提高开发效率。但是对于这些代码的维护通常是一个麻烦的事情:缺少一个统一的开源库查找平台、维持更新不方便等。CocoaPods是一个用于iOS、Mac开发的源代码依赖关系管理工具。它通过创建和更新Xcode的workspace来为我们的项目提供所需库的支持。它能够帮助我们解决代码库之间的依赖关系,并且提供了开源代码搜索功能,通过编辑和使用Podfile将多个开源库整合到项目中。
安装CocoaPods
CocosPods是使用Ruby开发的,我们直接通过RubyGems进行安装。在安装之前先更新一下RubyGems。不过出于众所周知的原因,下面的几个与gem相关的命令在运行前请先拿出你的梯(翻)子(墙)。
$ gem sources --remove https://rubygems.org/
$ gem sources -a https://ruby.taobao.org/
$ gem sources -l
$ sudo gem update --system
$ sudo gem install -n /usr/local/bin cocoapods
$ pod setup
经过一段时间的耐心等待后,CocoaPods终于安装完成,这时可以通过pod命令使用它了。
使用CocoaPods
1.创建一个Xcode工程——《WeiPan》,将它保存到projects目录,然后关闭Xcode。下面我们开始使用CocoaPods来管理项目依赖关系。
cd projects/WeiPan
pod init
pod init会在WeiPan目录下创建一个默认的Podfile文件,这是我们用来管理依赖关系的。通过修改Podfile可以往项目中添加开源库。使用文本编辑器打开Podfile进行查看和修改。
# Uncomment this line to define a global platform for your project
# platform :ios, '6.0'

source 'https://github.com/CocoaPods/Specs.git'

target 'WeiPan' do

end

target 'WeiPanTests' do

end
其中platform :ios, '6.0'指定target支持的最小系统版本。每个target的依赖关系都各自独立。CocoaPods提供了开源库查找功能,由于《WeiPan》需要使用HTTP网络功能,所以我们查找一个HTTP下载框架。
$ pod search network
-> AFNetworking (2.5.0)
   A delightful iOS and OS X networking framework.
   pod 'AFNetworking', '~> 2.5.0'
   - Homepage: https://github.com/AFNetworking/AFNetworking
   - Source:   https://github.com/AFNetworking/AFNetworking.git
   - Versions: 2.5.0, 2.4.1, 2.4.0, 2.3.1, 2.3.0, 2.2.4, 2.2.3, 2.2.2,
   2.2.1, 2.2.0, 2.1.0, 2.0.3, 2.0.2, 2.0.1, 2.0.0, 2.0.0-RC3, 2.0.0-RC2,
   2.0.0-RC1, 1.3.4, 1.3.3, 1.3.2, 1.3.1, 1.3.0, 1.2.1, 1.2.0, 1.1.0, 1.0.1,
   1.0, 1.0RC3, 1.0RC2, 1.0RC1, 0.10.1, 0.10.0, 0.9.2, 0.9.1, 0.9.0, 0.7.0,
   0.5.1 [master repo]
   - Sub specs:   - AFNetworking/Serialization (2.5.0)   -
   AFNetworking/Security (2.5.0)   - AFNetworking/Reachability (2.5.0)   -
   AFNetworking/NSURLConnection (2.5.0)   - AFNetworking/NSURLSession (2.5.0)
   - AFNetworking/UIKit (2.5.0)
从输出结果可以看出来,CocoaPods中有不少网络请求的框架,我们选择现在比较流行的AFNetworking,将->下面的第二行文字pod 'AFNetworking', '~> 2.5.0'拷贝到Podfile文件中就可以设置好依赖关系了,我们的项目依赖于AFNetworking 2.5.0。这时Podfile看起来是这样的。
# Uncomment this line to define a global platform for your project
platform :ios, '7.0'

source 'https://github.com/CocoaPods/Specs.git'

target 'WeiPan' do
    pod 'AFNetworking', '~> 2.5.0'
end

target 'WeiPanTests' do

end
使用pod命令安装依赖库。
$ pod install
Analyzing dependencies

CocoaPods 0.36.0.beta.1 is available.
To update use: `gem install cocoapods --pre`
[!] This is a test version we'd love you to try.

For more information see http://blog.cocoapods.org
and the CHANGELOG for this version http://git.io/BaH8pQ.

Downloading dependencies
Installing AFNetworking (2.5.0)
Generating Pods project
Integrating client project

[!] From now on use `WeiPan.xcworkspace`.
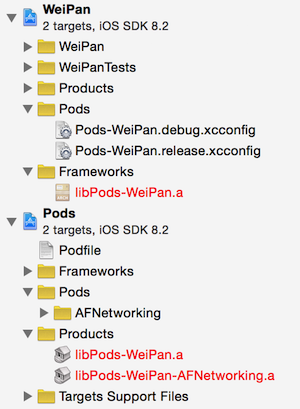
CocoaPods自动替我们下载了AFNetworking框架,并且创建了WeiPan.xcworkspace。以后我们使用它来进行工作(From now on use WeiPan.xcworkspace)。

2.在新浪微盘开放平台(http://vdisk.weibo.com/developers/)创建应用,获取App Key和App Secret。在Xcode中创建一个config.h文件并且定义两个宏kAppKey和kAppSecret来表示这两个值,以便后面使用。
3.使用OAuth 2.0登录新浪微盘,获取ACCESS TOKEN。我们使用AFOAuth2Manager来完成认证和存储用户信息。将Podfile的target部分改为下面的样子,并运行pod install。
target 'WeiPan' do
    pod 'AFNetworking', '~> 2.5.0'
    pod 'AFOAuth2Manager', '~> 2.0.0'
end
登录代码如下:
- (BOOL)webView:(UIWebView *)webView shouldStartLoadWithRequest:(NSURLRequest *)request navigationType:(UIWebViewNavigationType)navigationType
{
    NSString *path = request.URL.absoluteString;
    //1. 获取第一步的authorize code
    NSString *code = [_server authorizeCodeWithPath: path];
    if (code) {
        AFOAuth2Manager *_manager = [AFOAuth2Manager clientWithBaseURL:[_server accessTokenURL] clientID:[_server appKey] secret:[_server appSecret]];

        NSString *str = [_server accessTokenURL].absoluteString;
        //2. 获取第二步的access token
        [_manager authenticateUsingOAuthWithURLString:str code:code redirectURI:[_server redirectURI] success:^(AFOAuthCredential *credential) {
            //3. 存储登录后的信息(access token)
            [AFOAuthCredential storeCredential:credential withIdentifier:[_server storeIdentifier]];

            [self dismissViewControllerAnimated:YES completion:nil];
        } failure:^(NSError *error) {
            NSLog(@"error: %@", error);
        }];

        return NO;
    }

    return YES;
}
4.对于不再使用的库,可以直接从Podfile移除,再次运行的时候就会被CocoaPods从工程中移走,不需要手动管理。如果为了满足特定需求,改动了某个库中的代码,在安装其它代码库时这些修改也会被保留下来。
参考资料
1.http://cocoapods.org 2.http://www.raywenderlich.com/64546/introduction-to-cocoapods-2 3.https://github.com/Carthage/Carthage 4.http://vdisk.weibo.com/developers/
本文档由长沙戴维营教育整理。
戴维营学院(高级开发视频): http://v.diveinedu.com
潜心俱乐部(iOS面试必备): http://divein.club
