Coredata第二课 实体间的关系
戴维营教育原创文章,转载请注明出处。我们的梦想是做最好的iOS开发培训!
问题
如果多个实体之间有关联,比如Student拥有多本书(Book),怎么像数据库一样的能够表示这种关系?
解决方法
Core Data提供了relationship来表示实体(Entity)之间的这种关系,包括一对一、一对多等。
1 .打开Core Data的模型文件,可以看到每个Entity都有一个Relationships可以设置。我们在Student里面添加一个books属性,并将它的类型(Type)设置为To Many(一对多)。
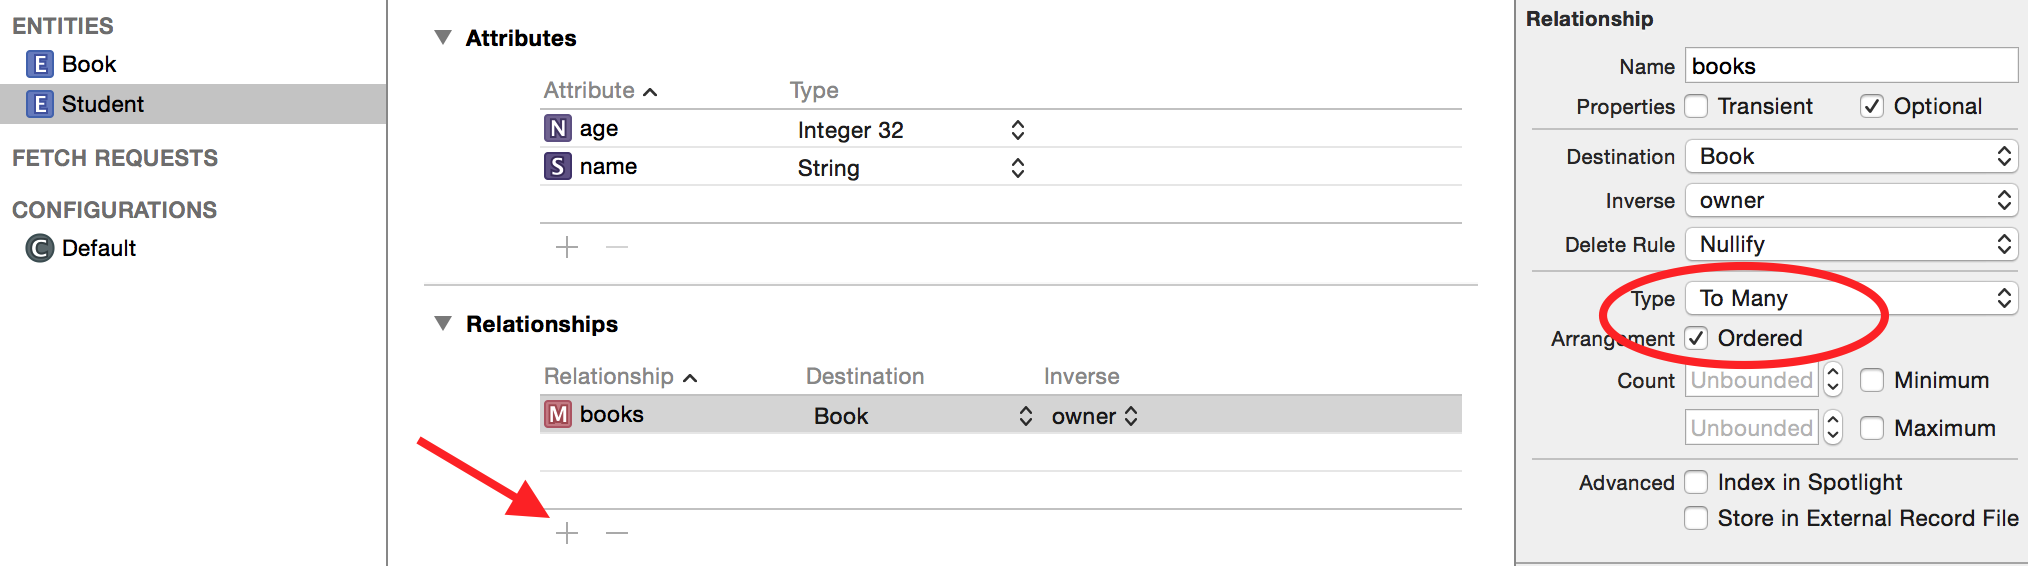
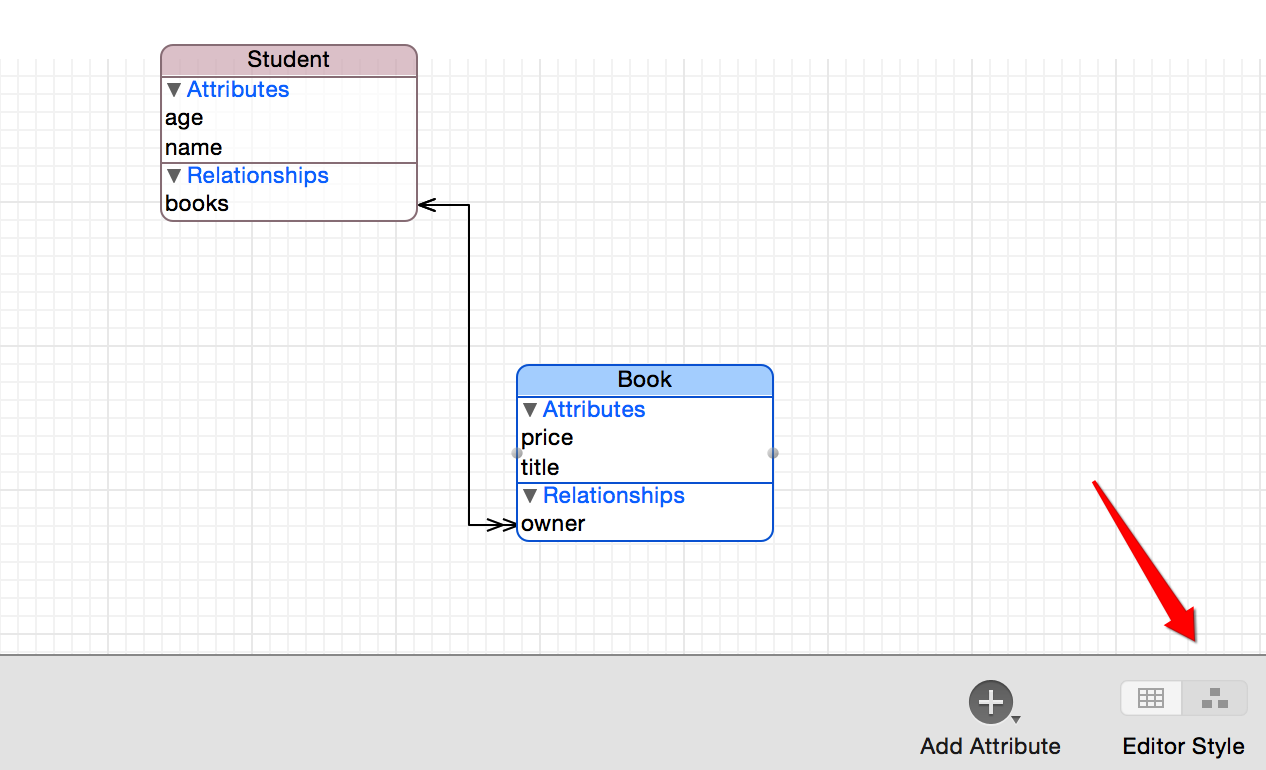
2 .给Books添加一个owner属性,并将Inverse设为books。这样的话,只要将book对象添加到Student的books中,就会自动将owner属性指向该Student对象。通过改变实体的展示样式能够让我们看的更加清楚。
3 .通过“Editor > NSManagedObject Subclass...”创建两个实体所对应的类。
Book:
@interface Book : NSManagedObject

@property (nonatomic, retain) NSString * title;
@property (nonatomic) float price;
@property (nonatomic, retain) Student *owner;

@end
Student:
@interface Student : NSManagedObject

@property (nonatomic, retain) NSString * name;
@property (nonatomic) int32_t age;
@property (nonatomic, retain) NSOrderedSet *books;
@end

@interface Student (CoreDataGeneratedAccessors)

//没有实现
- (void)insertObject:(Book *)value inBooksAtIndex:(NSUInteger)idx;
- (void)removeObjectFromBooksAtIndex:(NSUInteger)idx;
- (void)insertBooks:(NSArray *)value atIndexes:(NSIndexSet *)indexes;
- (void)removeBooksAtIndexes:(NSIndexSet *)indexes;
- (void)replaceObjectInBooksAtIndex:(NSUInteger)idx withObject:(Book *)value;
- (void)replaceBooksAtIndexes:(NSIndexSet *)indexes withBooks:(NSArray *)values;
- (void)addBooksObject:(Book *)value;
- (void)removeBooksObject:(Book *)value;
- (void)addBooks:(NSOrderedSet *)values;
- (void)removeBooks:(NSOrderedSet *)values;
@end
在Student是通过一个NSOrderdSet来表示一对多的关系的。这里之所以没有使用数组是因为需要保证数据的唯一性。我们还需要注意的是,在Student类中生成了许多管理Book的方法,但是这些方法都是没有实现的。比如我们需要添加一个增加Book的功能,就需要实现addBooksObject:。
- (void)addBooksObject:(Book *)value {
    NSMutableOrderedSet *books = [self.books mutableCopy];
    [books addObject:value];
    self.books = books;
}
4 .保存Student对象与Book对象。
NSManagedObjectContext *context = [AppDelegate appDelegate].managedObjectContext;

NSEntityDescription *entity = [NSEntityDescription entityForName:@"Student" inManagedObjectContext:context];
//创建Student对象
Student *stu = [[Student alloc] initWithEntity:entity insertIntoManagedObjectContext:context];

int r = arc4random_uniform(1000);
stu.name = [NSString stringWithFormat:@"Zhangsan: %d", r];

NSEntityDescription *bEntity = [NSEntityDescription entityForName:@"Book" inManagedObjectContext:context];
//创建Book对象
Book *book = [[Book alloc] initWithEntity:bEntity insertIntoManagedObjectContext:context];
book.title = @"红楼梦";
//添加Book对象
[stu addBooksObject:book];

//保存Student对象
[context insertObject:stu];
[context save:nil];
5 .查询Student对象,并通过打印查看是否保存了Book,并且能否通过book.owner得到它与Student对象的关系。
NSManagedObjectContext *context = [AppDelegate appDelegate].managedObjectContext;

NSFetchRequest *request = [NSFetchRequest fetchRequestWithEntityName:@"Student"];
NSArray *arr = [context executeFetchRequest:request error:nil];
for (Student *stu in arr) {
    NSLog(@"Name: %@", stu.name);
    for (Book *b in stu.books) {
        NSLog(@"Book: %@ -> %@", b.title, b.owner);
    }
}
6 .从结果可以看到,b.owner确实指向了一个Student对象。
2015-02-04 09:07:43.391 02-03-CoreDataRelationship[5169:235934] Name: Zhangsan: 333
2015-02-04 09:07:43.394 02-03-CoreDataRelationship[5169:235934] Book: 红楼梦 -> <Student: 0x7f9720d48bd0> (entity: Student; id: 0xd000000000040000 <x-coredata://C07E5BAC-C3F6-44B6-B21C-C3D3FBFA4ED1/Student/p1> ; data: {
    age = 0;
    books =     (
        "0xd000000000040002 <x-coredata://C07E5BAC-C3F6-44B6-B21C-C3D3FBFA4ED1/Book/p1>"
    );
    name = "Zhangsan: 333";
})
7 .总的来说Core Data自动替我们管理了实体(对象)之间的依赖关系,能够省去不少代码。
本文档由长沙戴维营教育整理。
戴维营学院(高级开发视频): http://v.diveinedu.com
潜心俱乐部(iOS面试必备): http://divein.club